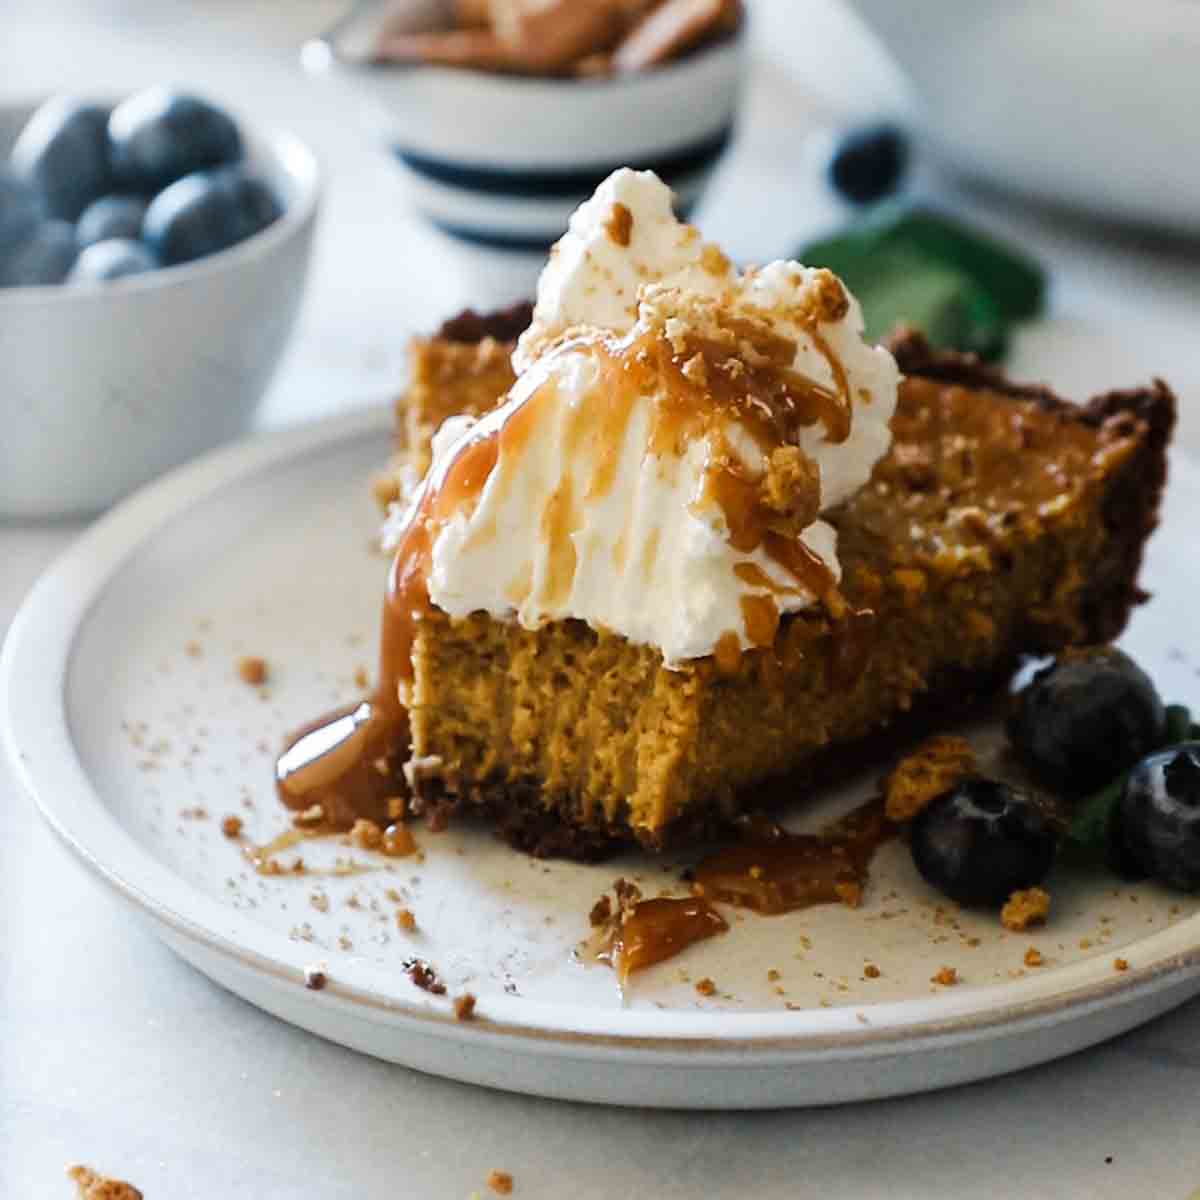
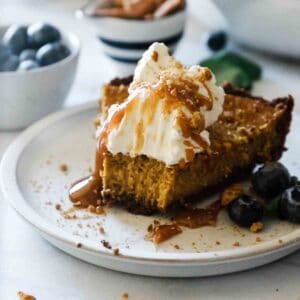
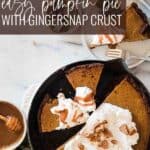
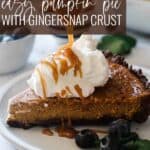
This 'aint your Grandma's classic pumpkin pie. Easy Pumpkin Pie with Chocolate Gingersnap Crust is the next level. Pie filling? Good, classic, perfect. The crust - sweet, spicy, with a hit of chocolate. Just make it this Thanksgiving. Seriously. Stop asking questions.
Why You'll Love This Recipe
I love serving this after a feast of brined turkey, stuffing, and mashed potatoes. OR anytime in October. Such a delicious seasonal recipe!
This recipe is not your standard pumpkin pie. I will pass on pumpkin pie always, unless it is this recipe. You're going to love:
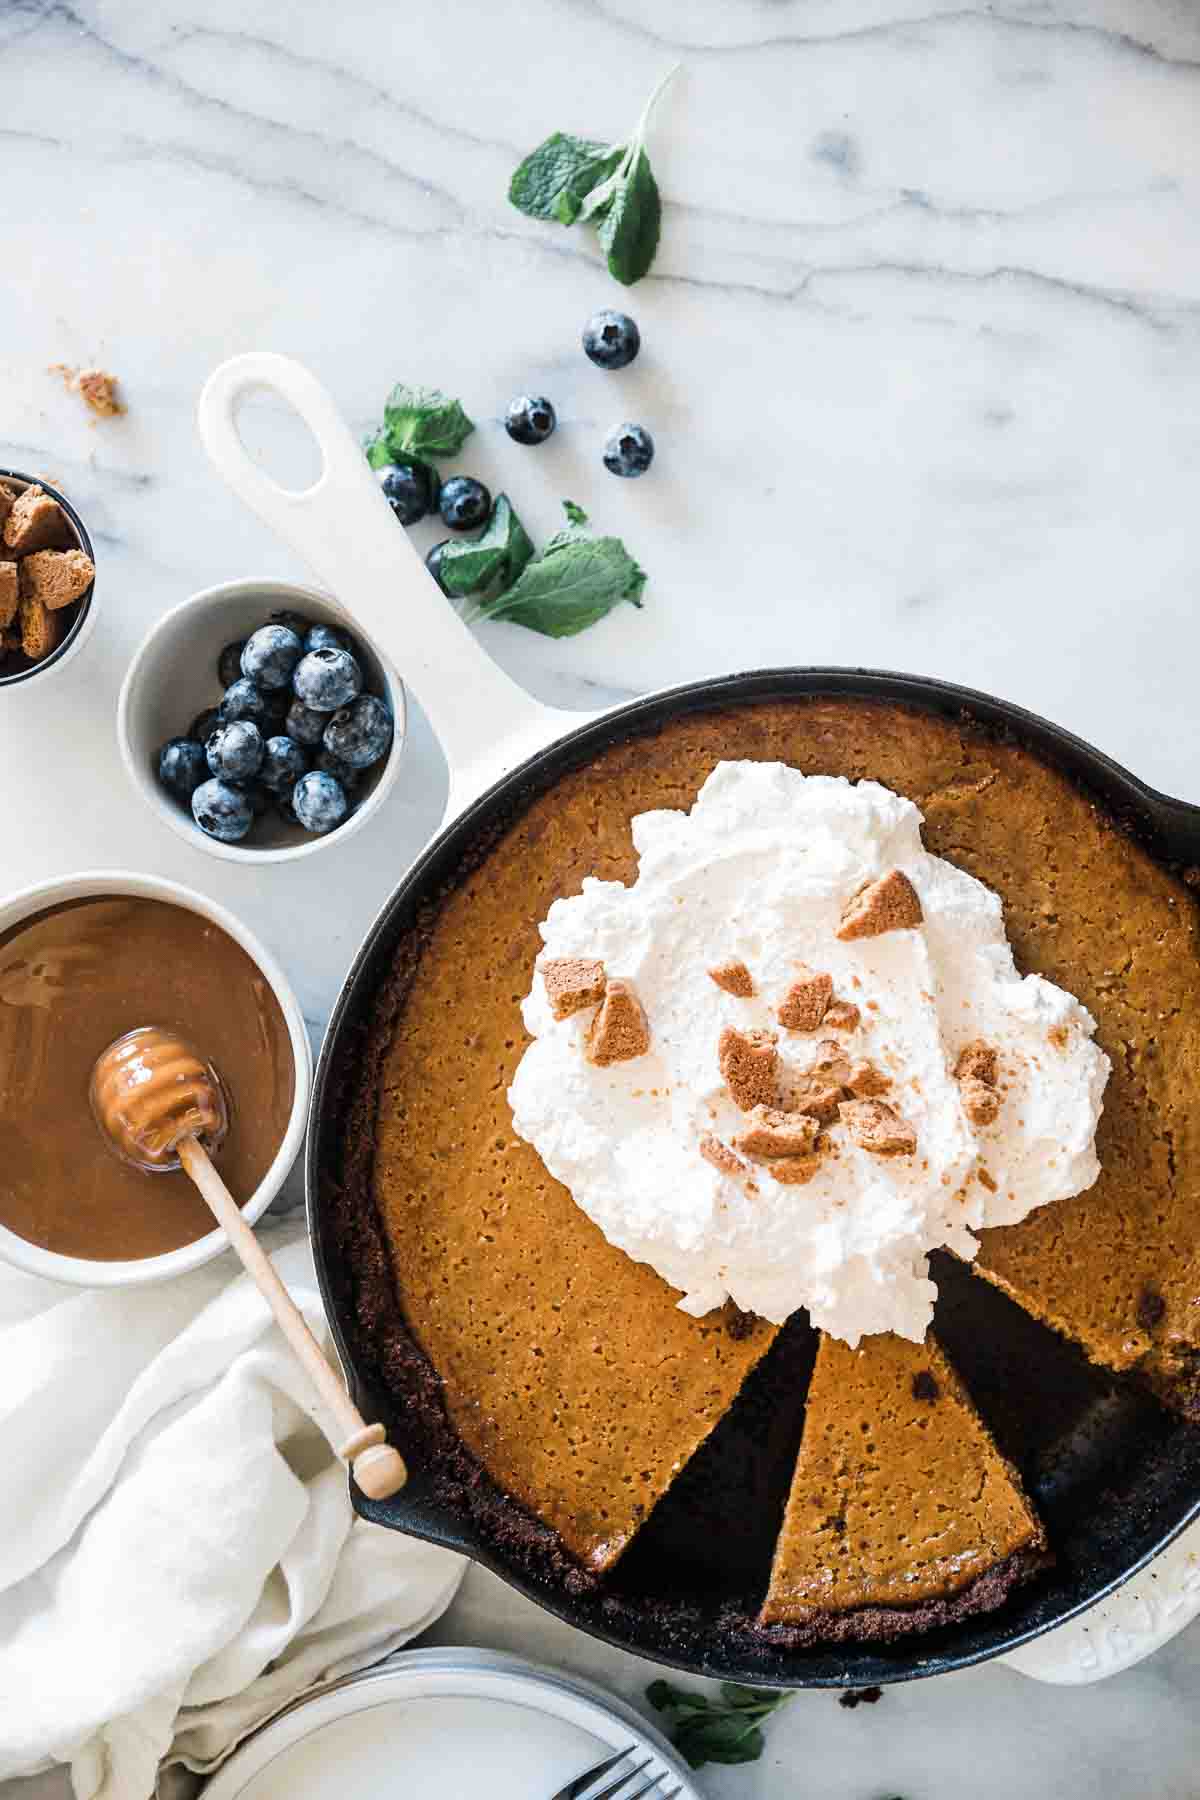
- The unique chocolate gingersnap crust. This will also save you some work making a traditional pie crust. The combination of the cocoa, spices, and pumpkin are amazing. If you do prefer a traditional pie crust recipe I recommend using our easy pie crust.
- The flavorful pumpkin pie filling that comes together quickly with basic pantry ingredients. This is an easy pumpkin pie recipe without sweetened condensed milk.
- The salted caramel topping that adds a depth of flavor and some extra sweetness.
About The Ingredients
The ingredients for this recipe can be purchased at your local grocery store. Here are a few details to note:
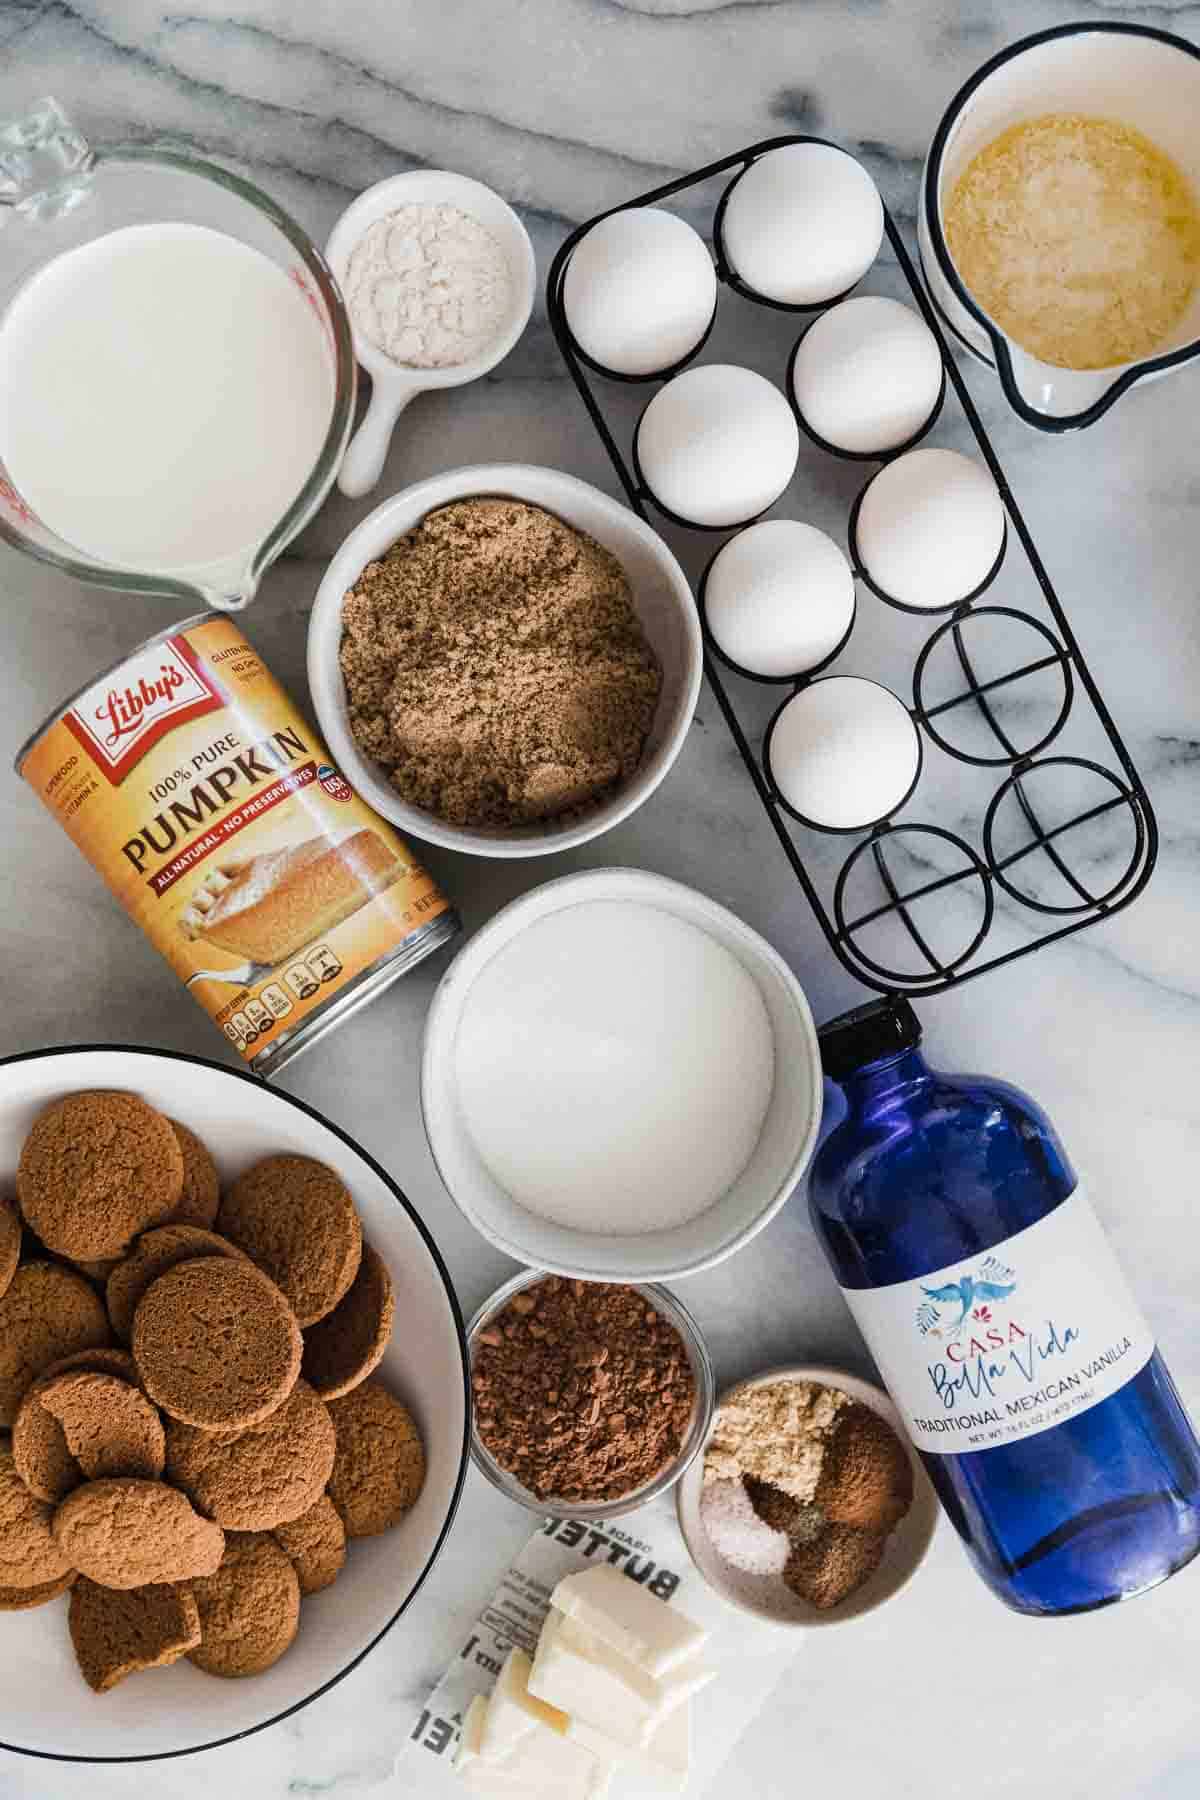
- pureed pumpkin - you want to purchased canned pureed pumpkin. Make sure you don't mistake it for pumpkin pie filling. Just get the pure pumpkin. This can be located on the baking aisle.
- heavy whipping cream - most pie recipes use sweetened condensed milk or evaporated milk, but we are using heavy whipping cream and a blend of sugars in place of the traditional condensed milk. And I think it makes it much more tasty!
- gingersnap cookies -this is the base of our crust. I'm not fussy about the brand. I just purchase whatever is the least expensive. These are located on the snack at cookie aisle at your grocery store.
- spices - in this recipe we use a variety of spices like ginger, cinnamon, clove, nutmeg and black pepper. It is really common to use pumpkin pie spice in recipes like this - but I think adding these unique amounts really makes a difference in the flavor of the recipe.
- cocoa powder - this is another item used in the pie crust. The combination of the warm spices of the gingersnaps and the cocoa powder are a match made in heaven.
- other baking items - you will also need a few other baking items like butter, flour, eggs, and vanilla.
A complete list of ingredients and amounts is located in the recipe card below.
How To Make Easy Pumpkin Pie with Gingersnap Crust
This recipe is for a deep dish pie. You can prepare for a deep dish, 2 standard pies, or 4-6 mini pumpkin pies.
There are a few steps to this recipe - I'm going to break them into the crust and pie filling, and then the salted caramel topping.
The Crust
Prep: Preheat your oven to 400 degrees Fahrenheit.
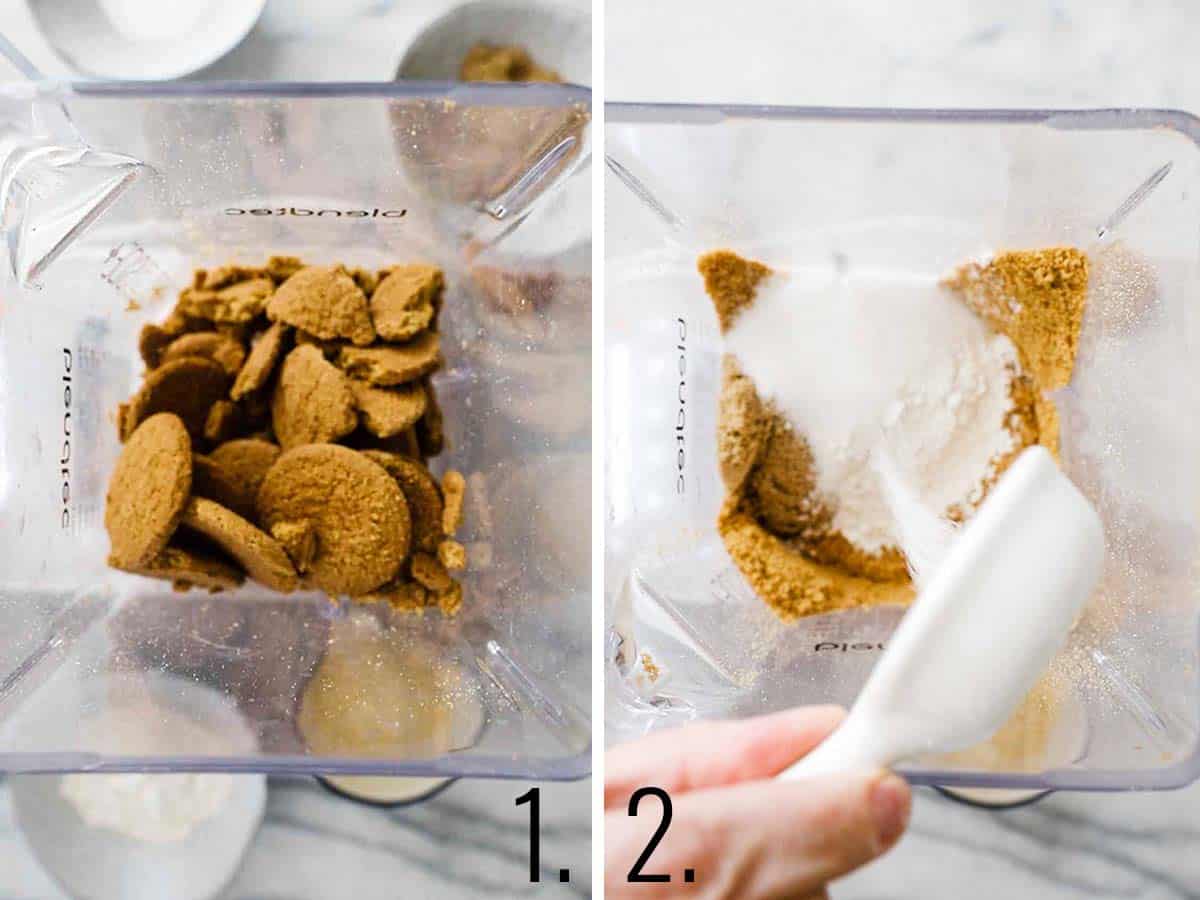
Step 1: Crush your gingersnap cookies in a blender or food processor. You can also crust them by placing them in a zipper bag and rolling them with a rolling pin until they are fine crumbs.
Step 2: Add in brown sugar, granulated sugar, cocoa, flour, and salt. Stir to combine.
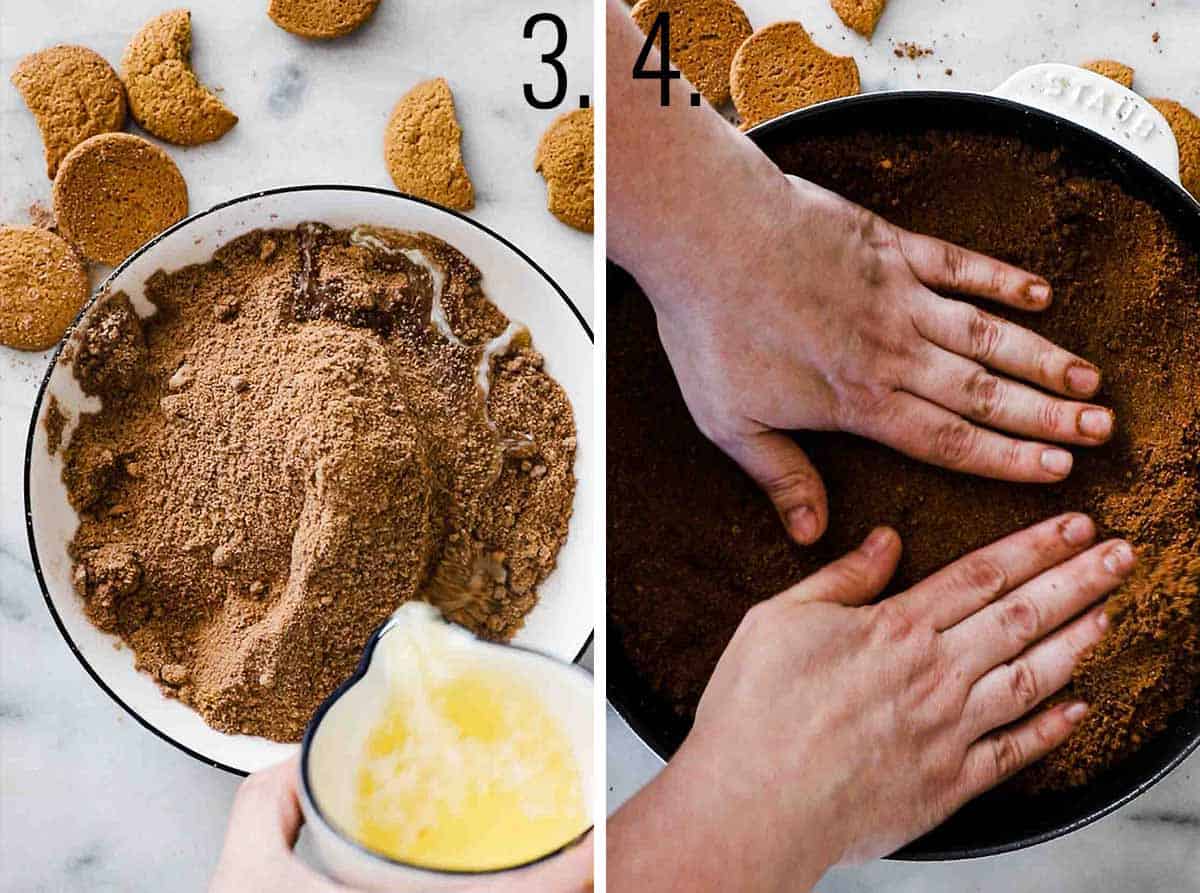
Step 3: Transfer to a medium sized mixing bowl and combine with melted butter until well incorporated.
Step 4: Press the mixture into a pie plate that has been sprayed with non-stick spray. Press it evenly into the bottom and up the sides. Bake at 400 degrees Fahrenheit for 5 minutes. Set aside to cool. Reduce oven temp to 350 degrees Fahrenheit after you remove the pan.
The Filling
Prep: Reduce oven temp to 350 degrees Fahrenheit.
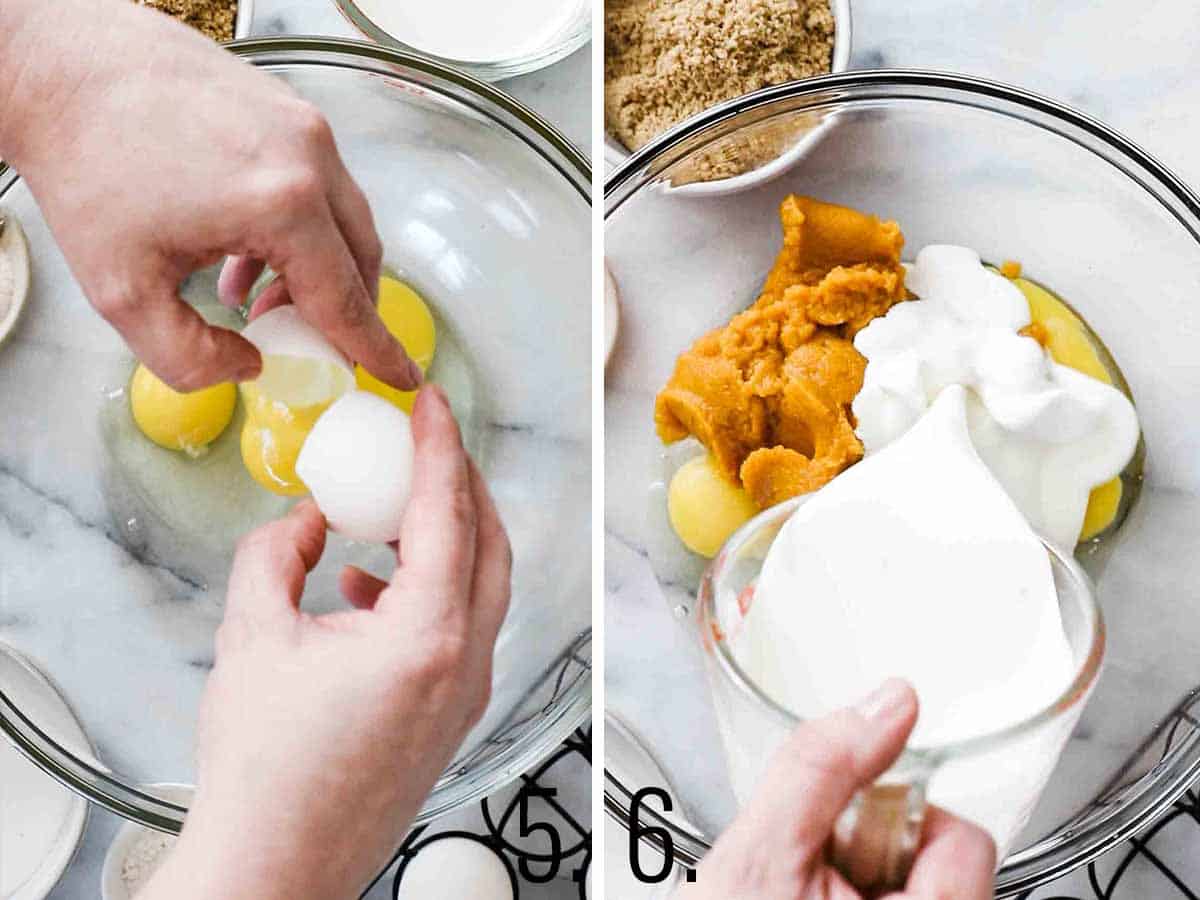
Step 5: Add eggs to a large mixing bowl.
Step 6: Add in canned pumpkin puree and heavy whipping cream.
Step 7: Using a hand or stand mixer, mix until well combined.
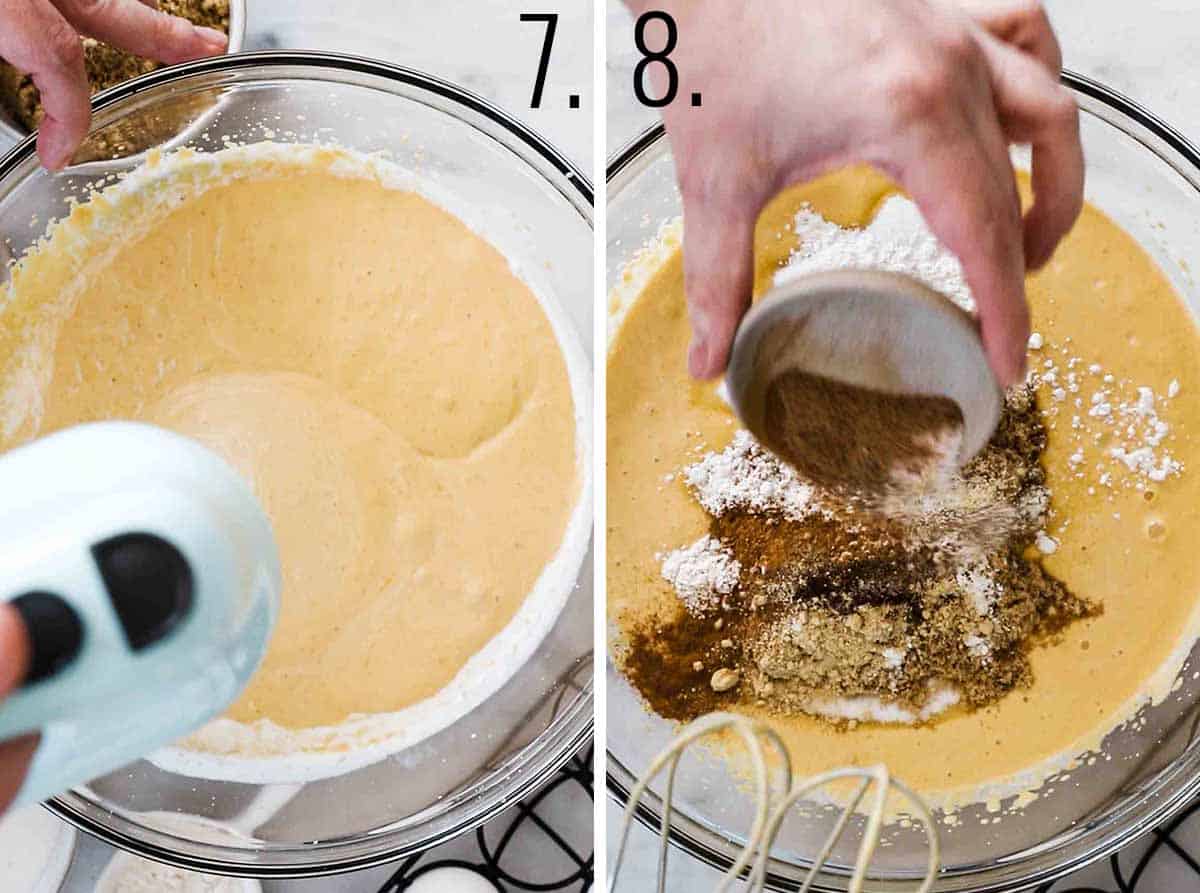
Step 8: Add in granulated sugar, brown sugar, flour, and spices (1 teaspoon ground cinnamon, ¼ teaspoon ground clove, 1 teaspoon ground ginger, ½ teaspoon ground nutmeg, ½ teaspoon salt, and ¼ teaspoon black pepper).
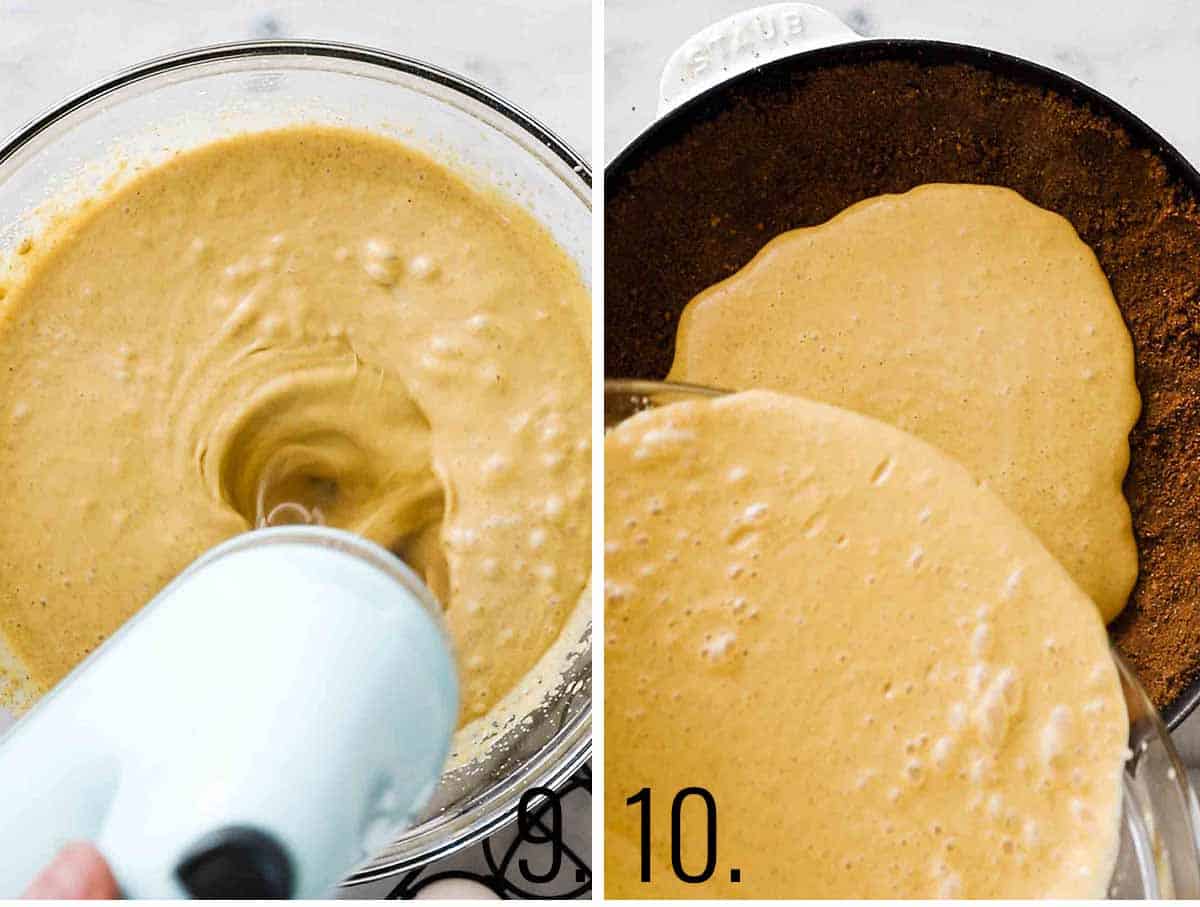
Step 9: Using a hand or stand mixer, mix until well combined.
Step 10: Pour filling into the prepared crust. Bake at 350 degrees Fahrenheit for 25 minutes. Remove from oven and cover the edges of the pie with foil and bake for an additional 20 minutes. Let cool completely to room temperature on a wire rack and then cover and transfer to the fridge to chill overnight.
Pro Tip: You only want to bake until the edges are set about 2" in, the center will be wobbly.
Making The Salted Caramel Sauce
While I do believe that this salted caramel sauce is delicious and worth it, I also understand that food preparations during the holidays can be stressful. You can opt to purchase store-bought salted caramel as a shortcut. I have done it many times, and I promise your guests will not have a better time if you make everything and run yourself into exhaustion.
The caramel can, however, be made up to a week in advance and stored in an airtight container in the fridge. Simply heat it up for 30 seconds in the microwave before serving. Here is how to make homemade caramel sauce:
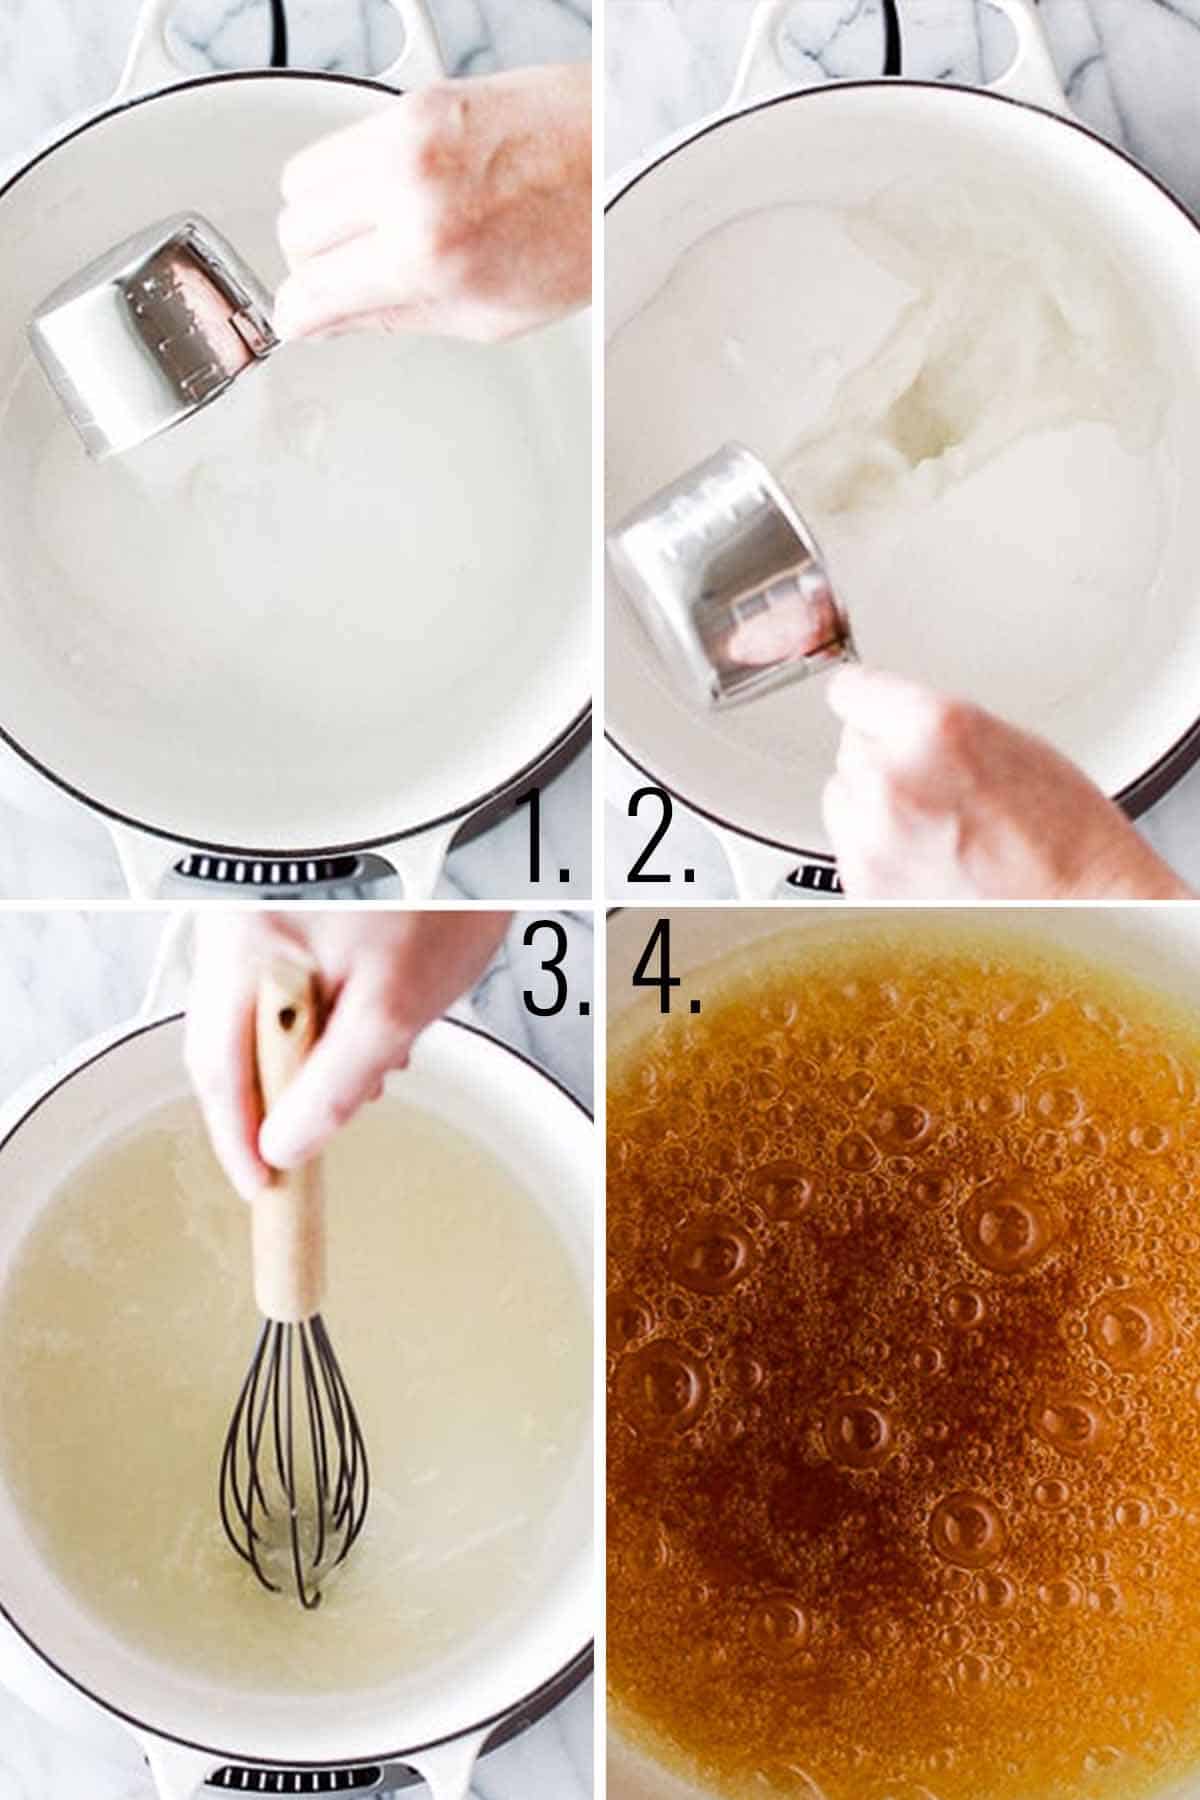
Step 1: In your heavy bottom pan, on medium heat, add your sugar.
Step 2: Pour in water.
Step 3: Stir until the sugar dissolves. It will become a clear liquid. Do not remove the whisk/spoon from the pan until it is dissolved. Then do not put it back in. This will cause the sugar to crystalize!
Step 4: Let the sugar come to a boil. Once the sugar is boiling on a med heat we need it to caramelize. Do not stir the caramel from here on out. Move the pan by GENTLY shaking and swirling the syrup around the pan. DO NOT LET IT SPLASH THE SIDES. You will see the syrup start to darken to yellow, then a mustard yellow/brown and then to a deep amber color. This is when you will turn off the heat. If you have a thermometer (highly recommended) this will be about temp 235-240
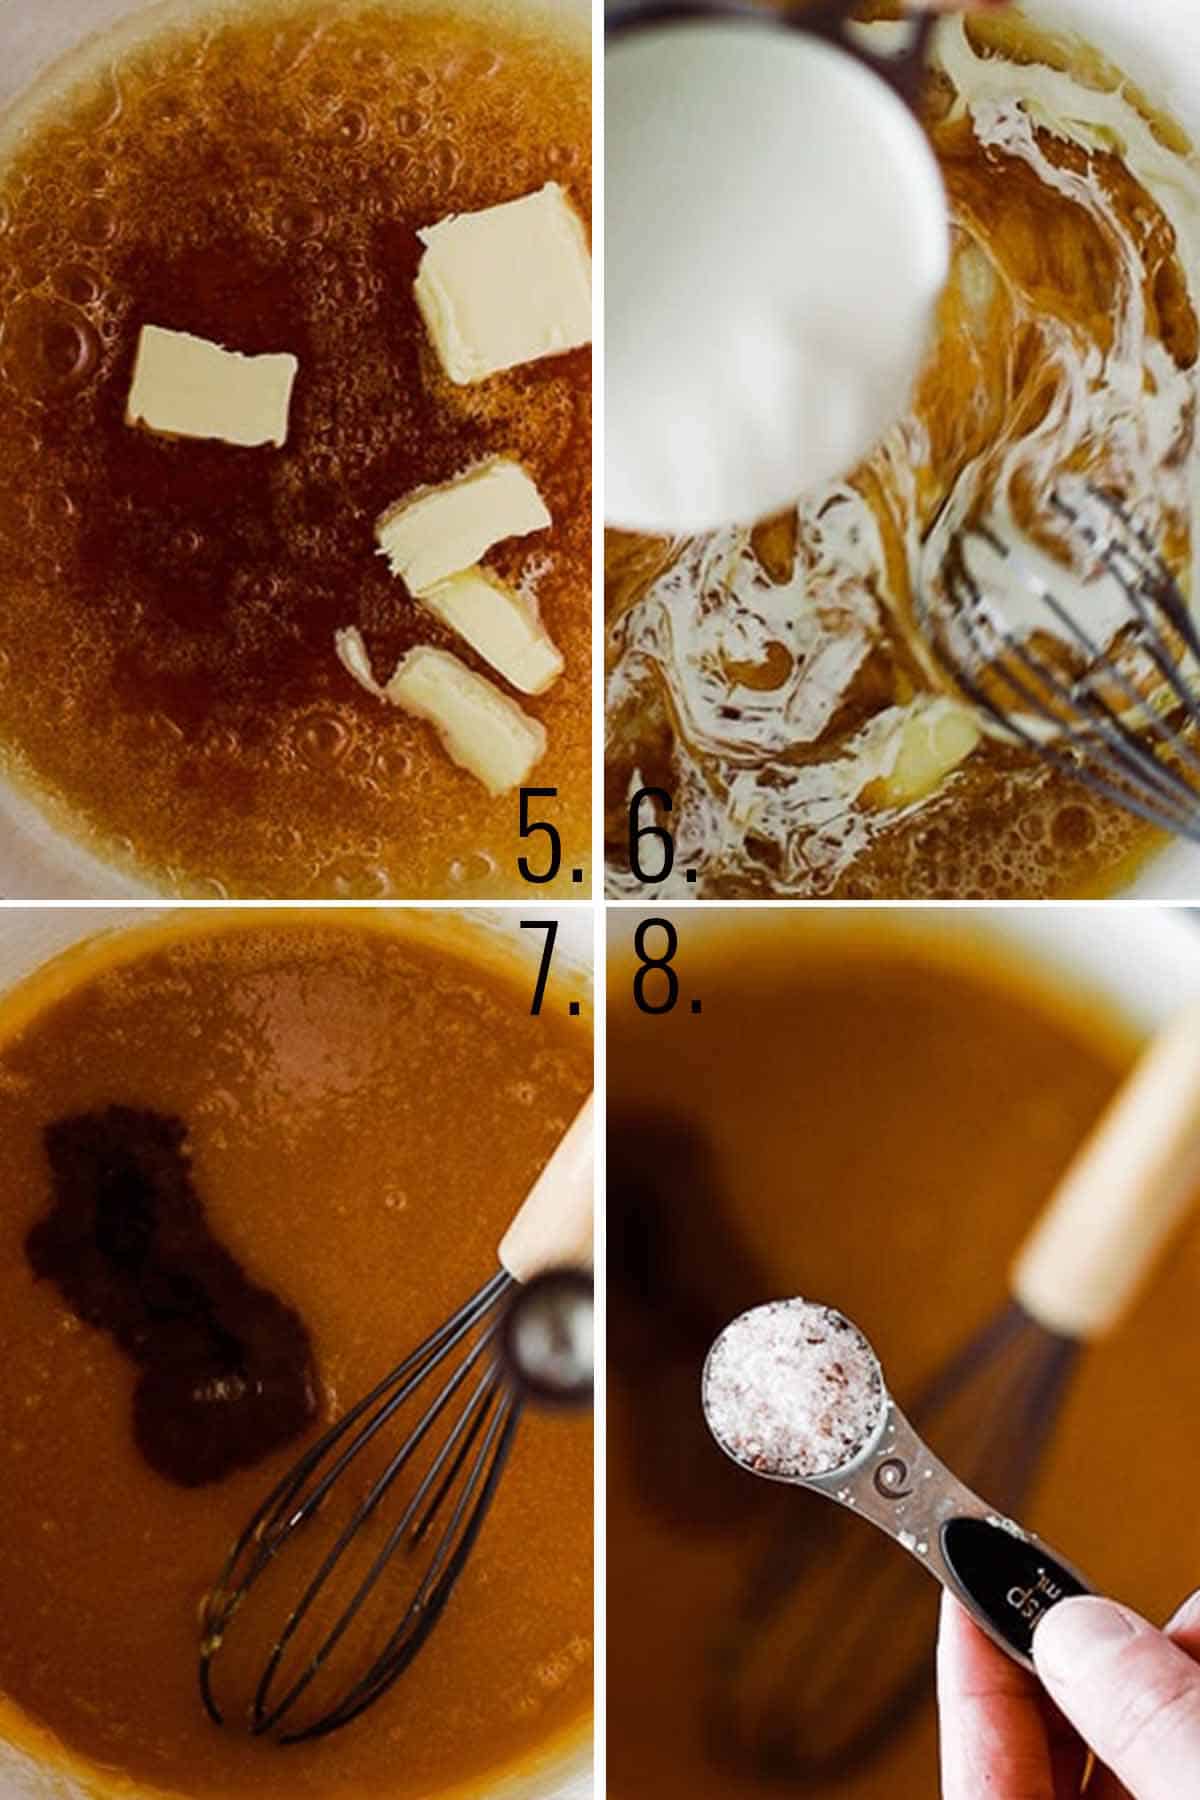
Step 5: Remove from heat and vigorously stir while you add in butter.
Step 6: Add in heavy cream and continue to vigorously stir.
Step 7: Add in vanilla and continue to vigorously stir.
Step 8: Add in salt,and continue to vigorously stir. As the caramel cools it will thicken. Once cooled slightly you can transfer to an airtight container and store in the fridge.
Pro Tip: For all of the tips and tricks on making caramel sauce, check out our complete blog post for the recipe.
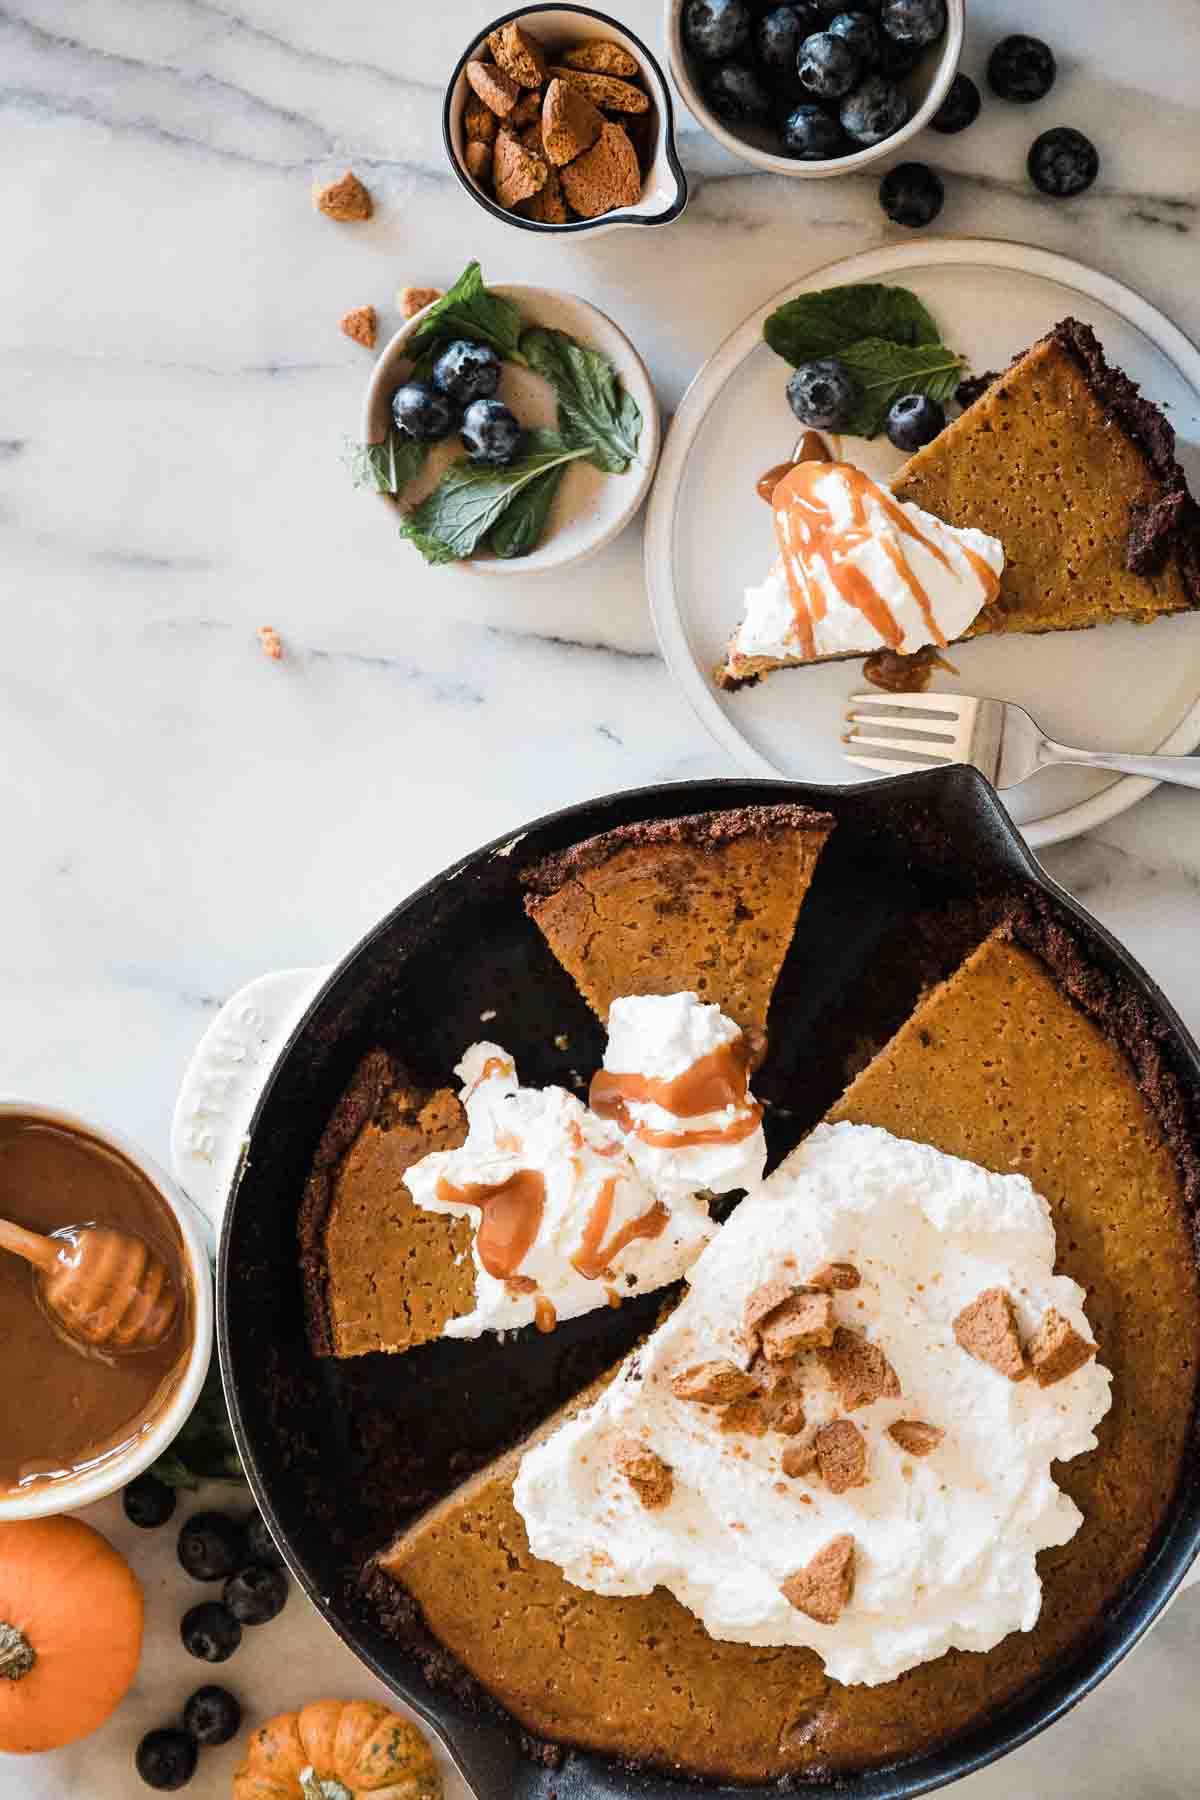
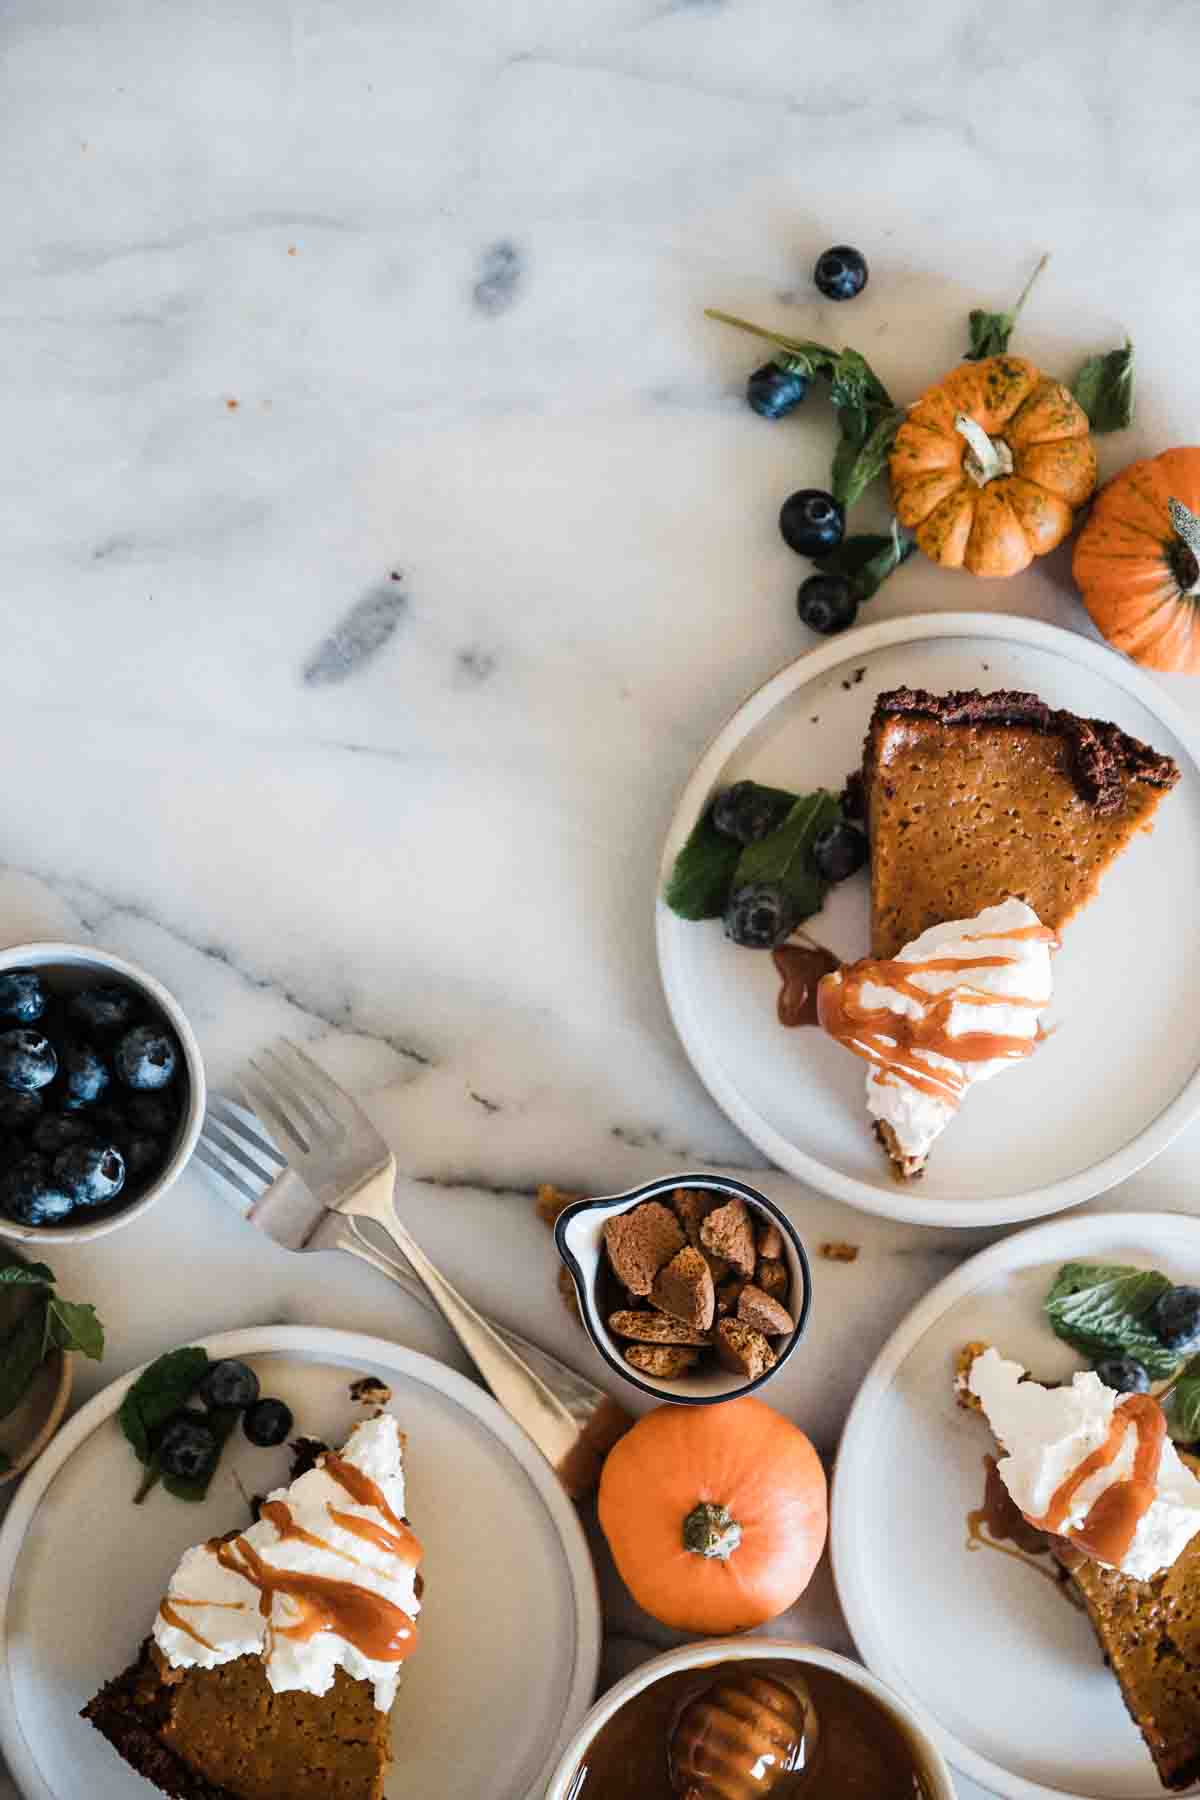
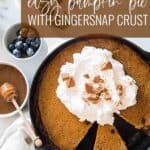
Serving The Pie
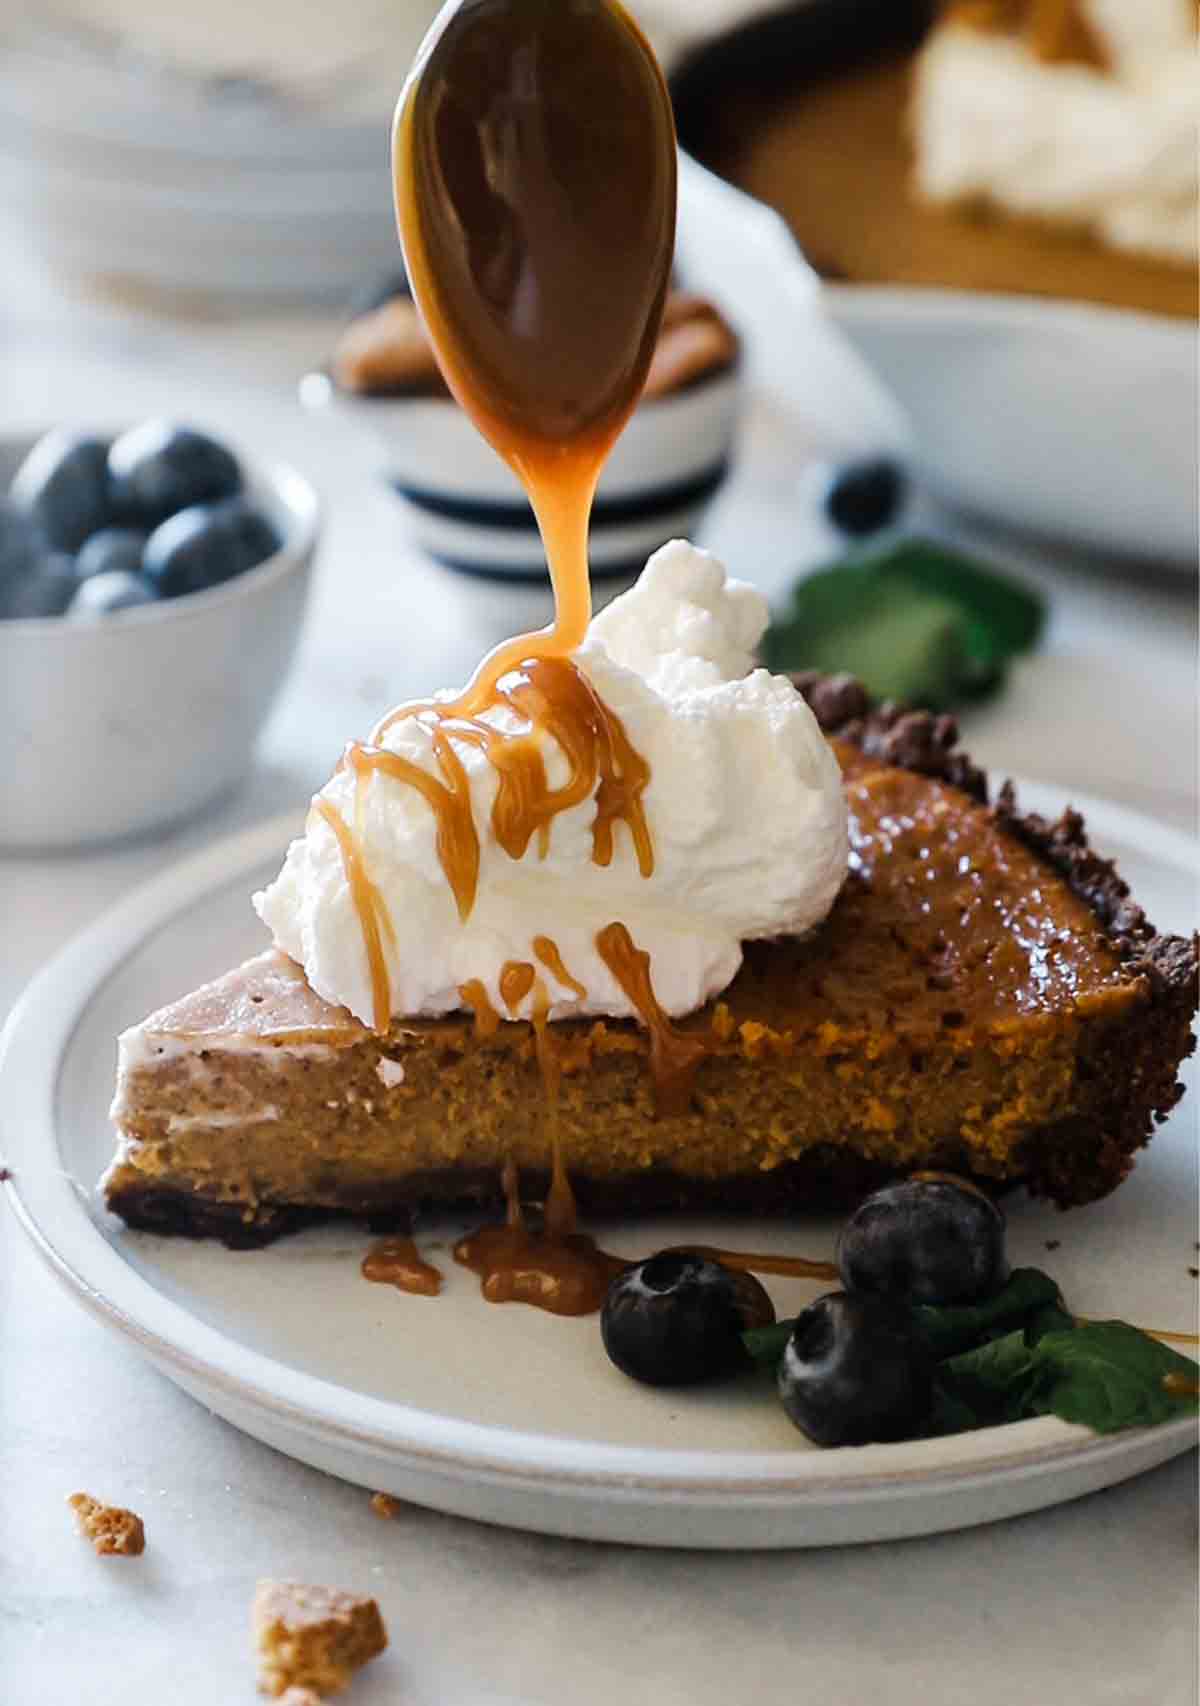
I like to serve this pie with a dollop of whipped cream. Check the recipe notes for tips on making homemade whipped cream. Or you can use store bought. Then I like to drizzle it with homemade or store-bought salted caramel. It truly is heaven on a plate!
Pie Pan Recommendations
There are several options when it comes to pie pans. There are two standard sizes, 9 inch regular and 9 inch deep dish. This recipe is for a deep dish pie pan, or you can use a standard sized pan and make two pies. Here are a few of my favorite pie plates:
- Glass pie dish - this type is a classic pan. It bakes up evenly and is sturdy.
- Ceramic Pie Pan - this pie pan is so beautiful and bakes up great. If you're looking for something beautiful, this is your guy.
- Cast Iron Pie Plate - there is nothing more indestructible than cast iron. For even cooking and something heavy duty opt for cast iron.
- Disposable Pie Pan - for easy clean up I like to use these disposable pie pans. They don't cook as evenly, but they sure are convenient!
FAQS
For this easy pumpkin pie recipe, I recommend pre-baking the crust because it prevents it from getting soggy.
Yes - the filling will be runny before baking. Baking the pie and chilling the pie will firm up that filling to the texture you want.
You only want to bake until the edges are set about 2" in, the center will be wobbly.
Pro Tips & Tricks
- Always Refrigerate - when it comes to homemade pumpkin pie, it always needs to be refrigerated. Making it homemade you are omitting a lot of preservatives that store bought pies contain. So this pie always needs to be stored in the fridge. Lovely wrap with plastic wrap or foil and the pie will keep 4-5 days
- Make Ahead - one of the great things about pumpkin pie is that it can be made up to 2 days ahead. Store covered in the refrigerator until you are ready to serve.

Pumpkin Pie with Chocolate Gingersnap Crust
Equipment
- Pie Pan
- hand or stand mixer optional
Ingredients
Gingersnap Chocolate Crust
- ⅓ cup melted butter
- 1 ¾ cup gingersnap cookies crushed
- ¼ cup brown sugar
- ⅛ cup granulated sugar
- 3 teaspoons cocoa
- ¼ cup flour
- ½ teaspoons coarse salt
Pumpkin Pie Filling
- ½ cup granulated sugar
- ½ cup brown sugar
- 1 Tablespoon flour
- ½ teaspoon salt
- 1 teaspoon ground ginger
- 1 teaspoon ground cinnamon
- ½ teaspoon nutmeg
- ¼ teaspoon cloves
- 1/ 8 teaspoon ground black pepper
- 3 eggs
- 15 oz pumpkin puree
- 1 ¼ cup heavy whipping cream
Salted Caramel Sauce
- 1 cup sugar
- ¼ cup water
- ½ cup heavy whipping cream room temperature
- 6 Tablespoon unsalted butter
room temperature - ½-3/4 teaspoons coarse salt
- 1 teaspoon vanilla extract
Instructions
The Crust
- Crush your gingersnap cookies in a blender or food processor. You can also crust them by placing them in a zipper bag and rolling them with a rolling pin until they are fine crumbs.
- Add in brown sugar, granulated sugar, cocoa, flour, and salt. Stir to combine.
- Transfer to a medium sized mixing bowl and combine with melted butter until well incorporated.
- Press the mixture into a pie plate that has been sprayed with non-stick spray. Press it evenly into the bottom and up the sides. Bake at 400 degrees Fahrenheit for 5 minutes. Set aside to cool. Reduce oven temp to 350 degrees Fahrenheit after you remove the pan.
The Filling
- Add eggs to a large mixing bowl.
- Add in pumpkin puree and heavy whipping cream.
- Using a hand or stand mixer, mix until well combined.
- Add in granulated sugar, brown sugar, flour, and spices (cinnamon, clove, ginger, nutmeg, salt, and black pepper).
- Using a hand or stand mixer, mix until well combined.
- Pour filling into the prepared crust. Bake at 350 degrees Fahrenheit for 25 minutes. Remove from oven and cover the edges of the pie with foil and bake for an additional 20 minutes. Let cool completely on a wire rack and then cover and transfer to the fridge to chill overnight. Pro Tip: You only want to bake until the edges are set about 2" in, the center will be wobbly.
Salted Caramel Sauce
- In your heavy bottom pan, on medium heat, add your sugar and water.
- Stir until the sugar dissolves. It will become a clear liquid. Do not remove the whisk/spoon from the pan until it is dissolved. Then do not put it back in. This will cause the sugar to crystalize!
- Let the sugar come to a boil. Once the sugar is boiling on a med heat we need it to caramelize. Do not stir the caramel from here on out.
- Move the pan by GENTLY shaking and swirling the syrup around the pan. DO NOT LET IT SPLASH THE SIDES.
- You will see the syrup start to darken to yellow, then a mustard yellow/brown and then to a deep amber color. This is when you will turn off the heat. If you have a thermometer (highly recommended) this will be about temp 235-240 degrees Fahrenheit.
- Remove from heat and vigorously stir while you add in butter, cream, vanilla, and salt.
- As the caramel cools it will thicken. Once cooled slightly you can transfer to an airtight container and store in the fridge. Pro Tip: For all of the tips and tricks on making caramel sauce, check out our complete blog post for the recipe.
Video
Notes
- 1 cup cold heavy whipping cream
- 3 tablespoons powdered sugar
- ½ teaspoon vanilla extract
- With a hand or stand mixer, beat whipping cream with mixer, add in sugar and vanilla.
- Beat 2-3 minutes until soft peaks form.
- Always Refrigerate - when it comes to homemade pumpkin pie, it always needs to be refrigerated. Making it homemade you are omitting a lot of preservatives that store bought pies contain. So this pie always needs to be stored in the fridge. Lovely wrap with plastic wrap or foil and the pie will keep 4-5 days
- Make Ahead - one of the great things about pumpkin pie is that it can be made up to 2 days ahead. Store covered in the refrigerator until you are ready to serve.

Rebecca says
Filling tastes wonderful but the pie never set up even after refrigeration, I think it could use one more egg, do you think I can bring to room temp and cook it again??
Kadee says
I’ve not tried cooking again after chilling, but I would think it would be ok to do.
Christina says
We made it for Thanksgiving to try something new. The flavor was delicious and the crust was absolutely wonderful! I did have two "issues" though. The center never set up. We even baked it for an extra 5 min and took it out when it was set two inches in. Second, I wish the recipe could be adjusted for just one can of pumpkin. A can is under 2 cups, so now we have a bunch of leftover pumpkin puree.
Kadee says
I’m glad you enjoyed the pie Christina! I actually will adjust the recipe so the pumpkin is listed in ounces. I usually just use 1 can when I make it, even though the recipe says slightly more. So thank you for bringing this to my attention.
Angela Jennings says
We made this for Christmas. We loved everything about it except the salt. Several family members weighed in thinking the 1/2 tablespoon must have been a typo. with 1/2T in the pie and another 1/2T in the crust, it over whelmed even the pepper, which was genius. We plan on making it again with less (maybe 1t would be enough?) as it was definitely a wonderful pie!
Kadee says
Hi Angela,
I think you're right! We recently ran a program on our blog that converted T and t to spelled out, and I think this is incorrect. I think it is supposed to be teaspoons. I'm so sorry.
Susan says
Okay, I was skeptical about the cocoa in the crust. I wanted to make something to take to a neighbor and I had everything in house for this recipe, so I thought, I would give it a go. I did have extra crust and filling so I had a couple of extra ramekins for home. I couldn’t wait, I ate one as soon as it cooled enough just adding the whipped cream. The crust was absolutely delish and the filling was just the perfect amount of sweet and spicy while also being light. Loved it, thank you!
Desarae says
Thank you!! I'm so happy you love it!
Anita says
This sounds and looks amazing! I’m totally making it for Thanksgiving!!